

GEM© Clinic: Lip Filler Techniques for Creating Projection

What lip filler techniques should you use to create projection? Our latest GEM© Clinic case study answers this common question. Using Global Evidence Matrix guidance, we explain compartment-respecting lip filler injection techniques to create projection alongside volume and definition. These will also help to reduce the risk of displaced filler.
Read on to find out more about the lip anatomy including lip compartments, and how to work with these structures to optimise your lip filler results. We include how your approach may vary for mature patients, listing the additional considerations aesthetic practitioners should bear in mind.
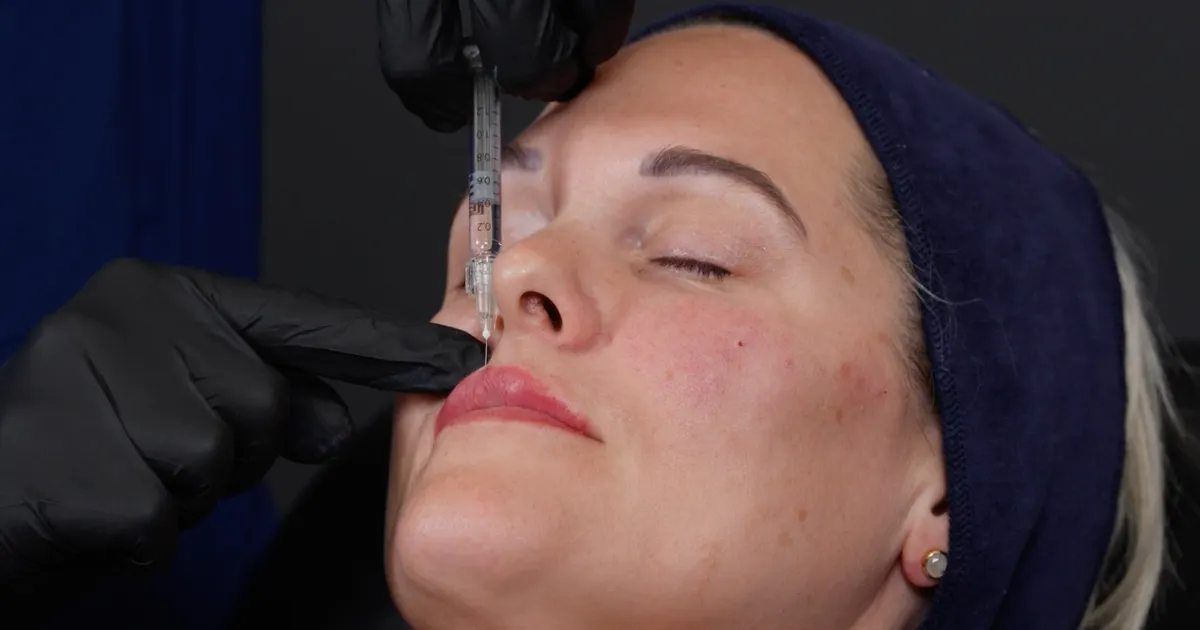
You can also scroll down to watch a video demonstration by Dr Max Greenfield, Harley Academy’s Head of Clinical Training. Taken from our latest multi-area GEM© Clinic case study, featuring Abi, 43, this live lip filler treatment is fully narrated and showcases what we cover here.
What's the difference between lip projection and lip volume?
The term “lip volume” refers to the overall fullness of the lips. Essentially, “lip projection” means how much the lips stick out; more formally, it relates to the forward protrusion or eversion of the lips from the facial profile.
Both can be addressed for beautification and rejuvenation, with projection tending to be part of a wider profile balancing plan.
What are lip compartments and where are they located?
The intra labial lip compartments are tiny micro structures that help form our lip shape. They sit under the tubercles, we’ve previously explored this particular anatomical feature in our article, Understanding Lip Anatomy to Reduce Lip Filler Migration Risks.
Dr Max explains, “There are six compartments that sit anterior to the muscle in the upper lip, and six that sit anterior to the muscle in the lower lip. And the more we respect these compartments, the less likely it is that we’re going to get displacement of filler outside of the lips.”
What lip filler injection techniques are used to create projection?
When treating the lips, compartment-respecting techniques should be your go-to.
As Dr Max shares, “We can use little micro boluses in those compartments or we can do horizontal threads. Or we can do vertical threads.”
These techniques are backed by the Global Evidence Matrix framework which is available to Harley Pro subscribers at HarleyAcademy.ai.
Treating the lip body with a needle or cannula
The key lip filler injection techniques that can help to add volume and create projection within the lip body, whilst respecting the lip compartments, are:
- Retrograde horizontal linear threads with a needle to create volume and projection but the lips’ natural morphology must be accounted for to avoid over-correction
- Bolus or microbolus techniques with a needle to add projection, definition and volume by enhancing the lip’s natural contours
- Vertical tenting with a needle that uses vertical retrograde linear threads to create height
- Fanning with a cannula to provide more eversion and less targeted volume. This can be a particularly useful technique for adding projection in mature lips.
How does lip filler technique vary for older patients?
Your lip filler injection technique shouldn’t vary significantly based on your patient’s age. What should vary is your approach. With more mature patients, lip treatments are less likely to be purely about beautification.
Explore volume, projection and definition
As we age, our lips can lose both volume - which can also impact projection - and definition. This means you need to explore exactly what your patient’s goals are during consultation, so you can deliver a treatment plan that tallies.
You can typically expect older patients to have thinner lips due to the ageing process. But naturally thin lips and lips that have lost volume use the same approaches, as we’ve previously covered in our article dedicated to this cohort.
It’s not necessarily the case that you’ll require larger volumes of filler for older patients; you’ll often find they’re looking for subtle restoration. What you might find, however, is that definition and/or projection are their key concerns.
Patients won’t usually use this type of terminology, so listen out for phrases such as:
- “I used to have more of a pout” - volume/projection
- “My lipstick bleeds a lot now” - lack of definition
- “I feel like my lips have got flatter with age” - volume/projection
- “My lip line looks a bit blurry” - lack of definition.
Whilst she is only 43, this “flattening” is something that our GEM© Clinic patient, Abi, expressed to Dr Max Greenfield during consultation. Below, you can find out what techniques he used to create this projection along with a small amount of volume, and watch the treatment video.
Use a lip compartment-respecting injection technique
Understanding and working in harmony with the lip anatomy, specifically the intra-labial compartments, is a useful approach for all patients. Mature patients will particularly benefit from the way it enhances the lip's inherent structure.
Injecting this way helps to minimise the risk of filler migration. Equally, when used with sound clinical judgement, it can help injectors avoid the dreaded “duck lips” presentation. This adverse event is often the result of aesthetic practitioners over-projecting.
Minimise your entry points
As we get older, we often become more susceptible to bruising. This can be due to skin getting thinner, or as a result of medications such as blood thinners or aspirin. With this in mind, it can be beneficial to account for this in your treatment approach.
The fewer entry points you can make, the better it is for your patient. This can mean:
- Less chance of bruising
- Lower risk of filler migration or displacement
- A more comfortable experience.
Depending on the patient and what you’re trying to achieve, a cannula will allow you to make fewer entry points.
When using a needle, if you follow the lip compartment-respecting techniques outlined in GEM©, as regular GEM© Clinic viewers will know, you’ll require fewer entry points than with older approaches. By positioning your needle properly between the relevant lip compartments, you can watch the filler spread throughout the lip body as you inject.
Keep your clinic room cool
Another tip worth noting is to maintain a cool temperature in your clinic room all year round to keep blood vessels constricted. This lowers blood flow and reduces your patients’ bruising or bleeding risk during injectable treatments.

GEM© Clinic: Abi’s lip filler treatment, explained
Upon assessment, Dr Max found that his patient, Abi, 43, had a lovely strong chin, but her lips sat slightly back relative to this. He noted that her lips had a great shape but required a small amount of revolumisation to achieve the projection that would help balance her profile.
Lip filler patient with lip blush
Before you watch the video demonstrating the following lip filler injection technique, it’s important we clarify something, Abi is not wearing lipstick during her treatment; she has lip blush.
Topical products must always be removed thoroughly prior to lip filler treatment for risk prevention. However, this is a form of semi-permanent makeup, which we’ve previously written about.
Needle size and filler product
For this compartment-respecting lip filler treatment, Dr Max used a GEM©-recommended 30G needle, and Revanesse Kiss.
Compartment-respecting lip filler injection technique for volume
First, he injected the lip connective tissue using horizontal threads of no more than 0.05ml of filler per thread. “This is to add some global volume back into the lips,” Dr Max explained.
“Once there’s a little bit of filler in the lips, it becomes harder to see the outline of your needle. This is often how you tell if you’re in the subcutaneous layer or underneath the muscle. So there’s a lot of ‘feel’ involved,” he warned.
The Global Evidence Matrix teaches that this is a great way to add both volume and projection. This is because placing threads closer to the wet/dry border specifically increases lip eversion, pushing the lip body outward.
Maintaining the right lip filler injection depth
Dr Tristan Mehta, Founder & CEO of Harley Academy, noted, “Lips are one of the most commonly treated zones of the face. But they’re also, I think, the one most commonly injected badly.”
As he observed Dr Max injecting the lip body, he said that, although he was “making it look easy”, there was a learning point here.
“One of the difficulties is maintaining the right injection depth throughout these retrograde horizontal threads,” shared Dr Tristan.
“We have to be mindful of the blood vessels in the lips and know that, the majority of the time, these vessels are deep to the muscles. So, we need to be injecting above or in front of the muscle. That requires, when injecting in this retrograde linear thread manner, maintaining that depth as you’re tracking forward and backward through the lips. And that’s something that injectors learn over time.”
He added, “Another way to do that is to do a bolus. You can use a bolus technique to inject in an anterograde way, and let the filler flow anteriorly to add volume to the lip compartments as well.”
Treating the vermillion border to add lip height at the Cupid’s bow
After restoring this volume, Dr Max added some more height to Abi’s lips at the Cupid’s bow. He talked through the process, which contributed to creating natural-looking projection for Abi, as follows.
“We have the peak of the Cupid’s bow, which is the GK point, and I’m going to do a vertical thread to get a bit more height. The important thing when we’re doing these vertical threads is that we’re staying within the vermillion border. We know that, if we disrupt the vermillion border, we increase the risk of filler displacing outside of the body of the lip.”
Dr Tristan cautioned, “You only really need a few vertical threads to create height. If you imagine we’re creating a scaffold in the front of the lip, where we’ve got those horizontal threads creating more anterior projection. Whereas these vertical threads can help to shape the lip in a more vertical direction.”
Dr Max used two vertical threads in total for Abi to increase projection and lip height at the Cupid’s bow. He pointed out that, “in someone who already has a lovely shape to their lips, you don’t really need to do much at all to get a nice result.”
Proportionate, profile-balancing results
Whilst maintaining natural proportions and enhancing her existing lip shape, he was able to achieve a subtly impactful result that also increased definition. Check out Abi’s final outcome from this lip filler treatment at the end of the video. These images were taken immediately before and after her treatment, so swelling is apparent in the latter photos.
It’s also worth noting that this lip augmentation procedure is an extract from a full, multi-area treatment plan. As such, Abi’s ‘after’ photos represent the results from the whole plan, which also included:
- Temple filler
- Pyriform fossa filler
- Tear trough
- Cheek filler (lateral zygoma).
You can watch Abi’s full face filler GEM© Clinic case study in its entirety, alongside a wealth of other video cases and other premium resources for aesthetic practitioners of all levels, with a Harley Pro subscription to HarleyAcademy.ai.
This subscription unlocks the complete GEM© content suite, including our online Certificate in Advanced Filler Techniques course, plus so much more.
From business and marketing advice plus KOL training, to treatment planning and real-time patient interaction simulation tools. Harley Pro offers clinicians engaging ways to develop new skills in every area of practice, all based on sources drawn from Harley Academy knowledge and/or published research. Plus, the more you learn, the more CPD you earn - and it’s all tracked on the site, ready to be self-reported!
Can other perioral filler treatments help to create lip projection?
Whilst the lip filler techniques outlined above are the primary choices for adding projection, some perioral treatments may indirectly contribute to this.
These include:
- Perioral line filler with a needle or cannula
- Philtral column filler with a needle.
Where can healthcare professionals learn lip filler techniques?
The full techniques for these perioral treatments - and for the lip filler approaches used in this case study - are outlined in the Global Evidence Matrix. This can be accessed via a Harley Pro subscription to HarleyAcademy.ai, which is open to healthcare professionals working as aesthetic practitioners, of all experience levels, and those considering the specialty.
These are also taught in our Perioral & Lip Filler Masterclass at Harley Academy London. This popular short course blends dedicated eLearning with practical injecting, and mentored support as you treat your own patient, provided by us. Held at our flagship aesthetics training school opposite the Bank of England in the City of London, our Injectables Masterclasses will soon be expanding to Harley Academy Manchester.
All Harley Academy aesthetics training courses use Global Evidence Matrix guidance, so you learn evidence-based techniques from the start of your journey. Our Level 7 Diploma courses include a free 12-month Harley Pro subscription so trainees can truly immerse themselves in a wide breadth of aesthetic education. If you’re looking for a fully accredited, Ofqual-regulated and JCCP-approved postgraduate qualification in medical aesthetics, this is worth your time.
We understand that the many training options open to doctors, dentists, nurses, pharmacists and more can be overwhelming, though. So, if you’d prefer a good old-fashioned chat about your options, with personalised advice on the best aesthetics courses for you, just let us know.
We hope you enjoyed this peek into our latest case study, and look forward to bringing you another one soon!
All information correct at time of publication
Download our full prospectus
Browse all our injectables, dermal fillers and cosmetic dermatology courses in one document
By submitting this form, you agree to receive marketing about our products, events, promotions and exclusive content. Consent is not a condition of purchase, and no purchase is necessary. Message frequency varies. View our Privacy Policy and Terms & Conditions
Attend our FREE open evening
If you're not sure which course is right for you, let us help
Join us online or in-person at our free open evening to learn more
Our Partners
















STAY INFORMED
Sign up to receive industry news, careers advice, special offers and information on Harley Academy courses and services